

How To Remove Tub Spout Without Set Screw
Tub Spout Installation Guide
Assist figuring out which type of tub spout you demand and how to install it
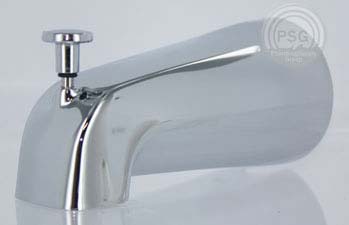 tub spout with diverter
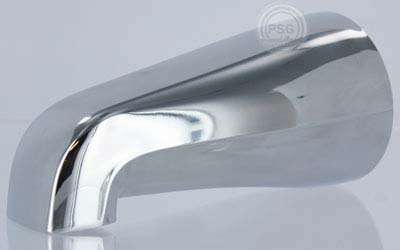 regular tub spout
Bones Tub Spout Types Reference Information
Bathtub spouts may need to be replaced for a few mutual reasons:
- the diverter can go worn out so that it no longer blocks the h2o flow to divert the water to the showerhead
- the threads that connect the spout to the pipe tin corrode or crack allowing h2o to trickle along the pipe and drip inside the wall causing impairment
- the stop on the spout can corrode or bit off or the finish may merely need updating if you make up one's mind to modify any of the other fixtures in the bathroom
Replacement is usually the best pick for each of those issues and it is fairly simple. Before replacing your tub spout, you will need to determine which type of tub spout yous have and what kind you volition demand to replace it. There are two basic types of tub spouts: diverter way that allows y'all to transport the menstruation of the water to either the tub spout or the shower with a diverter right on the tub spout and not-diverter style that flows merely from the tub spout into the tub. Within those 2 types are different attachment options: sideslip-on with setscrew or the threaded blazon.
How To Determine What Blazon of Tub Spout You Already Have
- Take hold of a flashlight and expect beneath the tub spout while it still attached to the wall. If yous can see a tiny screw on the underside of the spout, you have a sideslip-on tub spout with a fix screw.
- If there is no fix screw, you accept a threaded tub spout. Yous can remove your tub spout by twisting information technology counter-clockwise to see how your existing spout is threaded, if desired, but information technology is recommended you get out the spout on if you might need to utilise the tub before your new spout arrives.
Slip-On Spouts
A skid-on manner bathtub spout volition have a setscrew, which is a pocket-size screw located on the bottom of the tub spout. The sideslip-fit tub spout is designed to slip onto a 1/ii" copper pipe without the employ of any threads. The end of the copper that will be used must be free of burrs or rough edges, when using this type of spout.
Threaded Spouts
A threaded tub spout will not have a setscrew, and will twist off of the nipple or pipe. This fashion will either be a forepart-end threaded tub spout or a rear-end threaded tub spout.
- A front end end threaded tub spout can be used with either a tub valve without a shower, or with a tub valve that has a shower diverter congenital into the tub valve.
- The wall stop spout (likewise called "rear-threaded" spout) offers added convenience because it tin can exist connected to a tub spout stub-out nipple (one/2" or 3/4") at the wall stop of the spout with a Celcon bushing. Rear threaded spouts can be used for either new or remodeling structure. Several models are available with a conventional diverter near the wall, or with a specialized outlet zipper that allow for the utilize of manus-held showers or riser tubs for exposed showers.
- A telescoping spout is likewise a type of threaded bathtub spout which provides flexibility for many installation applications by allowing an aligning, ordinarily up to 1", to be fabricated for the finished wall. The telescoping spout attaches to either a 1/2" or 3/4" nipple with a Celcon bushing.
Tub Spouts with Brass Adapters - Threaded or Slip-on
- Some tub spouts may look similar a threaded spout but in fact thread onto a brass adapter that is installed onto the piping.
- There are two types of brass adapters, either a 1/2" IPS (iron piping size) threaded adapter or a one/2" nominal within diameter (CTS) slip-on adapter, depending on the type of tub spout originally purchased. Some contumely adapters are fabricated with ane/2" IPS (atomic number 26 pipe size) threaded adapter with a sweat 1/2" nominal inside diameter (CTS) skid-on fitting beyond the female person threads.
- The one/2" IPS threaded adapter can be threaded onto galvanized, contumely, stainless steel and other pipes with NPT (National Pipe Thread Taper) threads. These particular adapters tin besides be used on copper tubing past sweating the adapter onto the copper pipe. The copper piping is pushed into the adpater, through the threads, where a smooth snug slip fitting is located.
- The ane/two" nominal inside diameter (CTS) sideslip-on adapter slides over the copper tubing and is secured to the copper pipage by tightening the set screw, or can be sweat/soldered to the pipe.
- One time the brass adapter is secured to the pipage the tub spout is threaded onto the adapter. The tub spout itself has a plastic inner core with coarse threads to match the brass adapter male threads, assuasive the tub spout to take room for adjustment forward or backwards determined by the position of the adapter on the pipe.
Bathtub Spouts Removal and Installation Assistance
Cheque out our helpful video explaining the various types of tub spouts and tricks for installation, or go on reading for more detailed instructions.
How to Remove a Slip-On Tub Spout
Step 1: Remove whatsoever caulking effectually the wall end of the tub spout with a putty knife or razor.
Step 2: Locate the setscrew, which is typically located on the underside of the spout, close to the wall. They are often very minor so you may discover information technology helpful to apply a flashlight to locate the screw.
Step three: Determine which tool you will need to remove the screw; nearly will require a hex/Allen wrench, some may utilise a small Philips caput or flathead screwdriver. Loosen the spiral, existence careful not to drib information technology downwardly the drain.
Helpful Hint: Place a washcloth over the tub drain before loosening the setscrew to keep the screw from falling downwardly the drain.
Step 4: One time the setscrew is loose, use both easily to pull the tub spout straight out, away from the wall. If information technology'southward been there for a while it may be a bit stubborn. If so, you can attempt turning the spout slightly equally you pull.
Quick Tips: Before turning the spout, make sure the setscrew is loosened completely. If the setscrew is still tightened onto the piping while turning the spout, you are likely to damage the pipe coming from the wall. If it'south actually stubborn, you tin insert a screwdriver or a wrench into the tub spout opening for leverage, and turn the spout to loosen it. However, try not to wiggle the spout and pipe because as well much jarring may cause problems with the plumbing in the wall.
How to Install a Slip-On Tub Spout
Step 1: Check to make certain the pipe coming from the wall is the correct size. For slip-on tub spouts, your copper pipe should be a minimum one" and a maximum 2-7/8" in length, depending on the tub spout. Refer to the manufacturer'south specifications prior to purchasing and installing to ensure you lot have the appropriate length for your spout. If your pipe is shorter than the minimum length, you may need an adapter to make your new spout fit. If it is longer, you may demand to cut the pipage slightly.
Step 2: Make clean off the pipe coming from the wall if there is any build-up on the pipe. If in that location are burrs or rough spots on the terminate, use sandpaper to make the pipe shine.
Helpful Hint: For copper pipes plumbed through fiberglass or sparse walls the use of a stainless steel push lock nut tin can secure and lock the copper pipe in identify. You can find these stainless steel button lock nuts here.
Footstep 3: Slide the tub spout on the pipe until the tub spout meets the wall. So secure the spout by tightening the setscrew.
How to Remove a Threaded Tub Spout
Step 1: Use a large pipe wrench to remove the spout past securing the wrench over the tub spout and turning it counterclockwise to loosen. Removing a threaded tub spout really is every bit piece of cake as merely unscrewing it!
How to Install a Threaded Tub Spout
Step ane: Make sure that your new spout is the same length equally your old 1 to avoid having to adjust the pipes or use an adapter.
Step 3: Apply some silicone caulking effectually the edge of the where the pipe meets the wall to preclude water from dripping behind the spout and into the shower wall.
Step four: Thread the spout onto the pipe, start off slowly and so as not to cross threads. Tighten until snug and exist sure to line up the spout vertically with the rest of the fixtures.
How to Remove a Contumely Adapter Skid-On Style Tub Spout
Pace 1: Remove any caulking effectually the wall end of the tub spout with a putty knife or razor.
Step 2: Unscrew the tub spout in a counterclockwise rotation until the tub spout is removed off of the brass adapter.
Stride 3: Employ a ane/eight" hex/Allen wrench and un tighten the Allen screw counterclockwise. The Allen screw does non need to be removed all of the way out of the brass adapter, only loosened enough to allow the brass adapter to slide off of the copper pipage.
Helpful Hint: Identify a washcloth over the tub bleed before loosening the set-screw to continue the screw from accidentally falling down the drain.
Footstep four: Once the set-screw is loose, use both easily to pull the brass adapter direct out, away from the wall. If it'south been there for a while it may be a bit stubborn. If so, you lot can try turning the contumely adapter slightly to the left or correct as you pull.
Special Annotation: If your pipage is copper and yous can not observe a set spiral and yous can see the copper pipe is pushed within the contumely adapter, beyond any internal female person threads the brass adapter may have, then the brass adapter was soldered onto the copper tubing. Some contumely adapters have one/two" female pipe threads and are designed with a sweat fitting past the threads. A torch will be needed to rut the brass adapter to loosen the solder. In this state of affairs you lot will need to use a pair of insulated long handled pliers to hold the contumely adapter while you lot are heating it in order to remove information technology without burning your manus. Accept a pan of cold water fix to put the brass adapter into in order to cool information technology off.
How to Install a Brass Adapter (with set up screw) Skid-On Style Tub Spout
Footstep one: Make sure the pipe coming out from the wall is 1/2" Nominal (inside diameter) 5/8" outside diameter and protrudes from the finished wall surface 2" to 4". Brand sure the tube does not accept dents, deep scratches, kinks or bends. These could prevent the adapter from properly connecting to the tube. The cut off cease of the tube must as well be free from burrs inside and out, and the edge must not be rolled inward from a dull tubing cutter.
Pace two: Push the contumely adapter onto the tube so that the threaded end touches the finished wall surface. Tighten the ready screw until brass adapter is secure and unable to exist rotated on the pipage. Caution: over tightening the fix spiral can dent the tube.
Step 3: Hand tighten the tub spout onto the brass adapter. Be careful non to damage the o-ring on the outside of the brass adapter. Tighten the tub spout until the spout touches the finished wall surface.
Step 4: Tighten the spout a minimum of one additional turn or until all slack is taken upwardly betwixt the tub spout and the wall.
How to Install a Sweat/Solder Contumely Adapter Style Tub Spout
Footstep one: Brand sure the pipe coming out from the wall is 1/2" Nominal (inside diameter) 5/viii" exterior bore and protrudes from the finished wall surface approximately 3-1/2". Make sure the tube does not accept dents, deep scratches, kinks or bends. These could forestall the adapter from properly connecting to the tube. The cut off cease of the tube must also be free from burrs inside and out, and the edge must not exist rolled in from a dull tubing cutter.
Step 2: Remove the O-ring from the brass adapter.
Footstep 3: Clean the end of the copper tube with sandcloth or outside tube cleaning brush and the inside of the brass adapter with a ane/2" copper inside plumbing fixtures brush. This is the nearly critical step in obtaining a leak costless solder articulation. Don't affect the copper pipe, or the inside of the adapter, with your hand once cleaned.
Step 4: Apply flux to the pipage and to the inside of the brass adapter and slip the brass adapter onto the pipe then that the threaded end (wall side) is between 1/2" to ane-1/4" away from the finished wall surface.
Stride five: Apply heat and solder adapter to the pipe. Identify the heat source where yous want the solder to flow to. Take care to continue solder away from the o-band groove and the adjacent exterior bore of the groove.
Stride 6: Cool adapter and pipe with water or wet rag and brand certain the o-ring groove is make clean.
Step 7: Cut any excess copper pipe and so the copper pipe is non longer than 3-1/2" from the finished wall
Pace eight: Put the O-ring back into the groove on the brass adapter.
Step ix: Hand tighten the tub spout onto the brass adapter. Be careful not to harm the o-band on the outside of the brass adapter. Tighten the tub spout until the spout is firmly against the finished wall surface. There should not be whatsoever infinite left between the spout and the wall.
How to Install a 1/ii" Threaded Brass Adapter Mode Tub Spout
Pace i: Install a ane/2" fe pipe sized nipple so the stop of the nipple projects out from the finished wall surface between 1/2" and i-1/4"
Pace 2: Apply thread sealant PTFE tape or pipage chemical compound to the pipe nipple threads.
Step 3: Hand tighten adapter onto pipe nipple. Finish tightening the adapter with a standard pipe wrench, approximately iii turns, until snug. Do not over tighten. Take circumspection to not damage the O-ring or the o-band groove. The dorsum of the brass adapter (male person outside thread portion) must not project more than 1" from the finished wall surface.
Note: If your piping nipple projects out the maximum of 1-one/4" as described in pace one, the brass adapter will thread on approximately 1/two" leaving the back of the brass adapter less than a i" projection from the wall.
Step 4: Thread the tub spout onto the contumely adapter mitt tight. Take intendance to non damage the O-ring on the brass adapter. Continue to hand tighten the tub spout until the spout is firmly against the finished wall surface. In that location should not be any infinite left betwixt the spout and the wall.
Related Items & Articles
render to top ↑
Source: https://www.plumbingsupply.com/info-tubspouts.html#:~:text=If%20there%20is%20no%20set,before%20your%20new%20spout%20arrives.
0 Response to "How To Remove Tub Spout Without Set Screw"
Post a Comment